Understanding how to use MailerLite is essential if you’re going to get the most out of your email marketing.
MailerLite is a great platform for automating* emails and writing regular “newsletter” type emails, but you need to understand the lingo if you want to get the most out of it.
*Automation: sending emails without having to manually go in and hit send each time
In this article, I’ll go over the basics of MailerLite and explain the techy terms you might not be familiar with so that it’s easier for you to get cracking with your email marketing.
I’ll also share tips and pointers to help you get the most out of the platform.
First things first: What is MailerLite?
MailerLite is an email service provider that lets you write, send, and manage your emails in one place. You can use it to send routine newsletters or automated emails, as well as create landing pages.
The MailerLite dashboard is pretty intuitive once you understand the terminology. So let’s dive in.
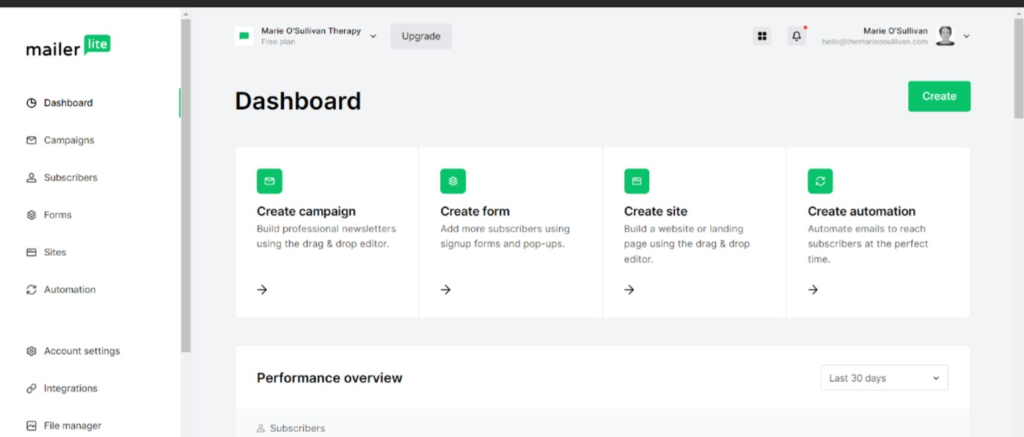
Mailerlite glossary of terms
Campaign: A series of emails that are sent to a specific list of recipients. “Newsletter” type emails we are probably all pretty used to receiving.
Often they are sent at a regular frequency – weekly/monthly on the same day at the same time…or more sporadically if you’re like me!
The magic of MailerLite is that if you are organised, you can batch these and schedule them to go out later. Or you can do them on the fly – no judgement!
Form:
This is what people fill in to sign up for your email list – usually, you collect their names and email address.
There are 2 types of forms – popup and embedded.
I don’t recommend popup forms for a few reasons:
When popups display immediately on a website and cover the content it can feel a bit jarring for visitors who don’t really know you yet.
Presumably, you’ve put thought and effort into your website, so
give them a chance to browse and get a feel for who you are and what you do!
Popups aren’t very good for SEO.
Embedded forms
These are forms that live on your website. Unlike popup forms, they’re static. I highly recommend having an embedded form on your website home page.
It can also be a good idea to add embedded forms at the end of your blog posts if you have a related freebie.
If you don’t have a website yet, don’t worry. There’s a way of sharing an embedded form so you can start building your email list straight away.
Site and Landing Pages
I would urge you NOT to use MailerLite to create a website! It’s best if you ignore that option completely.
Landing Pages:
You can easily build a no-code page giving details about your freebie offer using MailerLite blocks.
A landing page is like a mini-sales page that explains the benefits of your thing, who it’s for and the transformation it provides. People sign up by filling in a form to register. Even if your offer is free, you still need to explain what it is and how it works.
Use cases: sign up for a webinar/workshop/training/pre-recorded video/audio
Ideally, you’d build a landing page on your own website if you have one and are comfortable building a simple page but if not, the MailerLite landing page is a great alternative to help you put out an offer quickly.
Automation: This is where the tech magic comes alive! Let’s say someone signs up for your free thing. You don’t want to have to remember/be available to send it to them manually.
When someone signs up for your freebie, they may or may not know you very well yet. That’s why it’s important to create a welcome sequence/nurture sequence of emails so that you can start to build know/like and trust.
A welcome or nurture sequence is a set of emails that you send to people who are new to your email list. You can gently let them know that you have free and paid ways to help them.
Obviously, if they have signed up for a freebie it’s important that you send that as part of the email series! But after that, it’s about positioning yourself as a helpful person who is an expert.
For example, you might point them to a helpful blog post you’ve written or a Facebook video that is helpful for your ideal client.
On the free MailerLite plan you can “drip” or delay these emails so that they are sent out automatically at the interval of your choosing.
You can also share links to your paid offers for people who might be ready to get more support. Overall, the purpose of the nurture sequence isn’t necessarily to get people to sign up for your highest-priced paid programme immediately, it’s to warm them up and let them know that you have a solution when they’re ready.
Remember that someone who is new to your world might only have read a blog post you’ve written, or clicked a link in your bio, so the purpose of the nurture sequence is to help them get to know you a little better.
It’s no harm to remind people that you’re a business though, so you might like to mention an affordable way to work with you in your welcome emails.
The welcome sequence is a really important part of the customer journey and overall you want to “train” people to open your emails because you share helpful tips and, if possible, get them used to clicking on your links.
One of the reasons I love MailerLite is that it gives you access to the tech magic of automation for free, unlike other email service providers.
Subscribers: The people who have signed up for your mailing list
A note on the free MailerLite plan – sometimes people ask if they can get rid of the MailerLite logo that appears at the bottom of your emails on the free plan. If you don’t want the branding, you’ll need to upgrade to the paid plan.
My advice is just to live with it for now and enjoy all the amazing tech magic you can access using a free tool!
